The Guide:
LEVEL 40
Here we go:
Take the Zeppelin to Grom'gol outpost.
get:
[41]Mok'thardin's
enchantment - the one where you must get 10
Jungle Stalker Feathers
[41]Bloodscalp Clan
Heads
[42]
Ride north 31,17 kill Sin'dal
Turn in [37]Tiger Mastery.
Go to
[35]Neeka Bloodscar
[38]Little Morsels
[40]Lack of Surplus
[43]Pool of Tears (Elite)

1. Go to (48,41) get 8 Unprepared Sawtooth Flanks and found Noboru the Cudgel - start the quest [39]Noboru the Cudgel.
2. Go to Harborage(25,31). Turn in [39]Noboru the Cudgel. Get: [35]Draenethyst Crystals.
3. Go to "Fallow Sanctuary" at (54,28). Gather 6 Draenethyst Crystals and feed caged animals. Go to (63,18) - Galen Goodward – kill all around then escort him. Go to (47,39). Strongbox.
4. Turn in [35]Draenethyst Crystals.
5. Pool of Tears (65,45), Atal'ai Artifacts.
6. Misty Reed Post (80,80), turn in [40]Lack of Surplus and get [42]Lack of Surplus.
7. Stonard.
Turn in:
[38]Little Morsels
[43]The Pool of Tears, don't get the
follow up.
Your quest log should look like this at the moment:
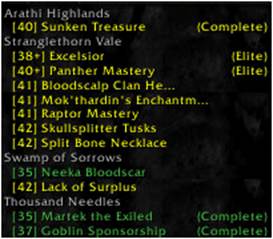
Ignore the ones from Thousand Needles and Arathi Highland.
Fly to Kargath,
Go to the inn and get the 2 following quests: [39]
[43]Broken Alliances
Kill every coyote and buzzard you find on your way.
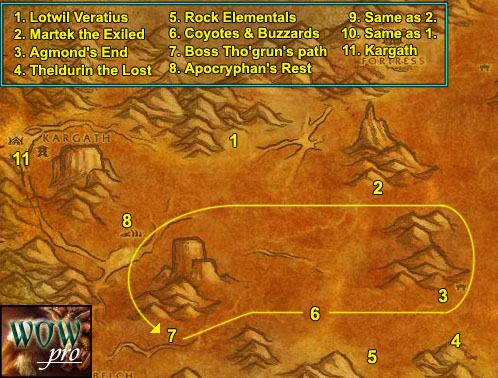
1. Lotwil Veratius, get [39]Study of the Elements:Rock
2. Martek the Exiled (42,52). Turn in [37]Martek the Exiled and
get [39]Indurium.
Talk to the goblin next to Martek, get the quest:
[40]Barbecued Buzzard Wings
[36]Power Stones (dungeon)
3. Agmond's End (50,65), kill the troggs = 10 Indurium Flakes.
4. Theldurin the Lost (50,76), get his quest [40]Solution to Doom (Dungeon).
5. Mirage Flats, with alot of Rock Elementals (40,78). 5 rock elemental shards, 3 large stone slabs and have reached level 41.
LEVEL 41
6. (35,72). 30 Coyote Jawbones and 10 Crag Coyote Fangs.
7. Boss Tho'grun (18,78).
8. Buzzard Wings or Gizzards, = Apocryphan's Rest (16,60), there are plenty buzzards there.
9. Martek the Exiled (47,52). Turn in [39]Indurium and [40]Barbecued Buzzard Wings. Get [38]News for Fizzle.
10. Lotwil Veratius (25,44) [39]Study of the Elements: Rock and get [42]Study of the Elements: Rock.
11. Kargath,
turn in [40]Coyote
Thieves, [43]Broken Alliances
and [39]
Now comes what we all hate, a big grinding session. There's no better alternative at this point. Sell and repair, buy food/drink and go grind on either: lesser rock elementals, rock elementals, troggs, dark iron dwarves at Angor Fortress. It's up to you, they are all good grinding spots.
Grind until you hit level 42, then hearthstone to Orgrimmar.
LEVEL 42
Frost Oil, Gyrochronatom and Patterned Bronze Bracers.
Swamps of Sorrows.
get [38]Little
Morsels from the Blood Elf chick inside the biggest building. On the
top floor of this building, turn in [40]Report to Helgrum.
Go to the

2. Sawtooth Snappers (75,15) = 6 Sawtooth Snapper Claws.
3. Misty Reed Post (81,81) and turn in [42]Lack of Surplus get the follow up. Turn in = Get the follow up [43]Threat from the Sea.
4. Kill 10 Marsh Murlocs and 10 Marsh Inkspewers, north along the shore = Murloc Flesheaters and Monstrous Crawlers =10 Murloc Flesheater kills.
5. Monstrous Crawlers (95,45)
6. turn in the quest [44]Threat from the Sea, get the follow up, turn it in immediately at Tok'Kar. Go back to the other orc npc, Katar, and get the new quest he has for you: [45]Continued Threat.
7. kill murlocs (yes, again!). Inkspewers and Flesheaters.
8. Oracles bottom of sea (94,22).
9. complete [45]Continuing Threat turn in the quest.
10. turn in [38]Little Morsels and Fresh [44]Fresh Meat. Repair/restock food/drink.
Fly to Kargath,
1. (13,85) = Greater Rock Elementals = 5 Bracers of Rock Binding (7,80).
2.Grind until you are 10000 XP away from level 43.
3. Lotwil Veratius (26,45). Turn in [42]Study of the Elements: Rock. Get [37]Coolant Heads prevail, turn it immediately = Frost Oil Get the follow up [37]Gyro...What? = Gyrochronatom Get the follow up [42]This is Going to Be Hard. Talk to Lucien Tosselwrench, who stands behind Lotwil. Get his quest [42]Stone is Better than Cloth = Patterned Bronze Bracers
LEVEL 43
4. turn in [42]This is Going to Be Hard, get the follow up and turn it in at Lotwil, get the follow up [45]This is Going to Be Hard. A level 45 Fam'retor Guardian will spawn, kill it and loot Lotwil's Shackles of Elemental Binding. Turn in the quest at Lotwil, congratulations on your first trinket!
5. fly to
Your quest log should look like this at this time:
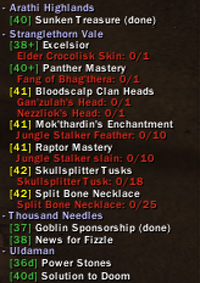
In
Get the quest [45]Tran'rek.
1st floor of the
Set your Hearthstone to the Booty Bay Inn.
Get out of the
Stranglethorne pages
From the bank, go up the pier and in the first house to the left you should
find "Sea Wolf" MacKinley, get the quests [41]Scary Shaky and [45]Stoley's Debt
from him.
Head towards
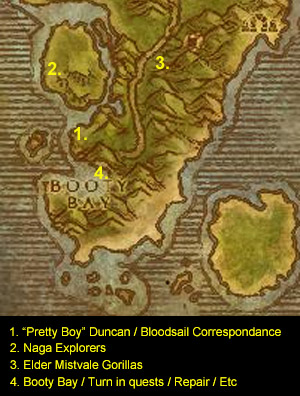
1.

Click it, turn in the quest and get the follow up [41]The Bloodsail Buccaneers.
2. Go northwest across the bridge Kill those nagas
= 10 Akiris Reed.
3. Mistvale
Gorillas (31,68). = 5 Mistvale Giblets.
4.
Up the slope right after First Mate Crazz, go to the
house to your left and find Sea Wolf MacKinley, turn
in the quest and get the follow up [44]Voodoo Dues.
Go to the top floor of the
In the room just before Fleet Master Seahorn get [41]Up
to Snuff from Deeg.
Find Dizzy One-Eye and get [42]Keep
an Eye Out. Dizzy is behind a big building close to the forge, which
is actually quite close to the exit of
The next session doesn't involve much traveling so no map is needed.
1. go east towards the shore named
2. South (27,82). = Bloodsail Orders or Charts. Basically, the Bloodsail Charts and Orders
Then wander up and down the shore where you came from and kill Bloodsails until you get :
1. 10 Bloodsail Swashbuckler Kills
2. 15 Snuff (can drop from any Bloodsail)
3. 1 Dizzy's Eye
(can drop from any Bloodsail)
3. Hearthstone to
Go to the top floor of the

1. (39,41) go east and you will find Venture Co. Goblins = 10 Singing Blue Crystals.
2. Go west to the other side of the road, Jungle Stalkers (34,37) = 10 Jungle Stalker Feathers.
3. Ride to Grom'gol, turn in [41]Mok'thardin's Enchantment and get the follow up.
4. Ride north = Elder Saltwater Crocolisk. = Elder Crocolisk.
5. (21,11). Look at this zoom of the minimap to know what path to follow:
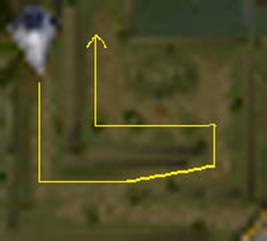
Nezzilok the Dire = (24,10) if you followed the map above Gan'zulah,
6. Nesingwary's Expedition (36,10).
Turn in [41]Raptor
Mastery, don't get the follow up. [40]The Green Hills of Stranglethorn.
7. Grom'gol.
Bubbling Cauldron = [41]Bloodscalp
Clan heads, click the cauldron again and take [40]Speaking
with Neezzliok and [45]Speaking with Gan'zulah.
8. Ziata'jai Ruins (42,37). Clear the camp =Ziata'jai Trophy Skulls and loot the Ziata'jai Trophy.
9. Follow the little path northeast until you reach Balia'mah Ruins (45,33). Kill all the trolls there as well. When this camp is clear, loot the Balia'mah Trophy Skull.
10. Follow Ruins of Zul'Mamwe (47,38), get 18 Skullsplitter Tusk, 25 Splitbone Necklaces and level 44, this is a good grinding spot.
LEVEL 44
11. Spend your talent point and go back to the Ruins of Zul'Mamwe. Our
objective is to complete the quest [46]Speaking with Gan'zulah.
All the quest objectives are in the ruins of Zul'Mamwe,
so let's just go there and kill everything in the way. Just be careful, there
are many patrols and you can get easily overwhelmed if you don't pull
carefully.
Skullsplitter Headhunters and Berserkers
can be found in the southeastern part of the ruins (48,43) - which we
avoided until now - go there and kill what you need for the quest, be careful
to avoid the named elite Mogh the Undying.
Now comes the difficult part, we have to kill a level 45 named with two level
44 guards. You can find that named - Ana'thek
the Cruel - inside the cave at the end of the path going through the ruins (45,44). Ana'thek and his guards
sometimes come out of the cave for a walk, but don't attack them then, you will
probably get adds and die. It's safer to wait for Ana'thek to be back in the cave and attack him inside it.
Wait for your long cooldown abilities and your potion
timers to be up, clear the area around the cave mouth to have some space, then
charge in, kill the named fast, loot him and run away. If one of the guards is
a Spiritchaser and you have no way to cc it -
Polymorph or sap - kill it first, run away and then come back for the named.
It's safer this way, because the Spiritchasers tend
to heal the named and then things get ugly. I tried it with the rogue - even
though I could have just used sap - to evaluate the difficulty, and it was no
problem, I could easily take one down, run away and come back for the named
without a single death.
Once you have looted the Broken Armor of Ana'thek, make sure you don't miss anything on the kill
list of [46]Speaking
with Gan'Zulah (you might be missing a few
hunter kills).
12. Ride northwest, back to Grom'gol.
Turn in [42]
Take the zeppelin to Orgrimmar or Undercity and train your new skills, sell, repair and restock consumables.
Hearthstone to
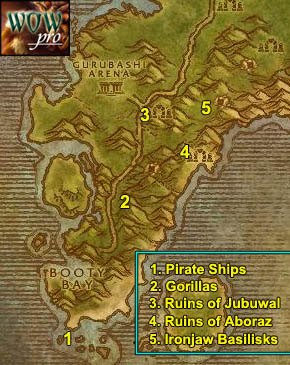
1. Get out of
Let's start with the ship which is the most to the west (30,39).
Instead of describing step by step how everything is done, I made a video out
of it, with explanations inside:
Note: The parchment I looted at the bottom of the ship - Cortello's
Riddle - can spawn in any of the three ships, so you'll have to check
the bottom floor of each ship until you find it. It can also spawn in other
parts of the ship, so check every corner of each ship carefully, but it mostly
spawns on the bottom floor.
As you can see in the video, I never had more than two on me at the same time,
and didn't ever need to use a potion, nor was I close to die at any moment. I
didn't even use sap or blind, and I used stealth just while eating as a habit,
but it was totally unneccessary.
When you pull the middle floor, don't fight in the stair. As soon as you aggro something, get off the stairs, or you might aggro something from the captain's cabin through the floor,
it's an annoying bug but it's easily avoided if you don't fight on the stairs.
In case you have difficulties with Fleet Master Firallon,
I made short video of it:
Fleet Master Firallon (Middle ship) is the
hardest of all as you can see, as he is level 48. However in the video, I
deliberately didn't use sap or blind, and my cooldowns
weren't ready for him. Though I still managed it - barely - but that was
without using all the abilities at my disposal, and the gear of that rogue is
really nothing special, not a single enchant and only two blue items. This
proves that anyone can do it with some patience and tactics.
The most tricky pull is always the captain room, sometimes you will end up with
3, what you can do is try to kill one fast and run away from the ship, then
come back quickly before it respawns. However, there
is almost always a way to get only 2 at a time.
Any class can do it if they pull carefully.
Do the same for the other two ships and you should have [45]The Bloodsail
Buccaneers complete and have Cortello's
Riddle. Right click it and get the quest [43]Cortello's Riddle.
Note: Ignore Brutus, that iron golem standing at the top of the
eastern ship. He doesn't drop anything particular and is a pain to kill.
2. Now let's move on to something easier. Get back to the wild shore
and ride back to the main road. Go to
3. Get back on the road and ride north for a while, until you reach
the Ruins of Jubuwal
(33,51). Clear the camp until you can pull JonJon The Crow, he
should come with an add, could be a hard fight but it's doable. Loot Jon-Jon's Golden Spyglass,
then clear yourself some space around the little ruins just behind where
Jon-Jon was, there stands Maury 'Club-Foot" Wilkins with two Zanzil Something.
Now you probably can't take all 3 at the same time, so try to kill one of the
minions fast then run away, rinse and repeat until you are left with just Maury
Wilkins. Kill him and loot "Maury's Clubbed Foot".
4. Go back on the road and just a bit south until (33,53), go east through a breached wall and keep going until you hit the Ruins of Aboraz (40,57) and kill Zanzil Minions there until you find Chucky "Ten Thumbs" inside the ruins and loot "Chucky's Huge Ring" from him. Keep killing Zanzil dudes until you get 12 Zanzil's Mixtures, avoid Zanzil the Outcast himself though. If you run out of mobs to kill, go back and forth from this camp to the other. Any Zanzil Something can drop the Mixture.
5. Get back on the road and ride north and then go northeast at the
crossroads of Gurubashi arena. Just after that you
should pass a big gate and to the right you should see a small path going into
the jungle (37,49). That's our next stop, clear the way towards the cave at the end of that
path, the basilisks we need to kill are named Ironjaw
Basilisks and are higher level than the ones outside. Enter the cave at (42,50) and kill Ironjaw
Basilisks until you have 3 Pulsing Blue Shards.
The shards are rather rare, I estimate them to drop
about 30% of the time. When you're done, hearthstone back to
In
Fly to Stonard, Swamps of Sorrows.
From Stonard, follow the road west and then go north to the bridge at (23,48). Look under the bridge for a Soggy Scroll. Zooming in to 1st person view helps to see it.
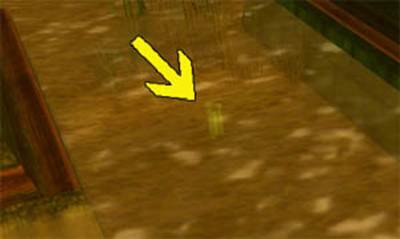
Click the scroll, turn in the quest and get the follow up [43]Cortello's Riddle.
Ride back to Stonard and fly to Grom'gol.
In Grom'gol turn in the quest [41]Mok'thardin's
Enchantment, don't get the follow up. Turn in [45]The Singing
This should make you ding level 45, or you should at least be quite close. If you don't ding level 45, go grind until you do on the skullsplitter trolls for example.
LEVEL 45
Take a Zeppelin to Orgrimmar,
sell / repair / restock consumables.
Now you have two options:
1. Get a group and go to Uldaman,
follow my Uldaman
Instance Guide.
2. You hate Uldaman? No problem, proceed with
the guide, you'll just have to grind more later on.
Fly to Brackenwall,
Dustwallow Marsh. If you don't have that flight path,
fly to
Get the quest [43]Overlord Mok'Morokk's Concern from Overlord Mok'Morokk next to the bonfire, [43]Army of the Black Dragon from Tharg next to the eastern exit of the village, and [43]Identifying the Brood from Draz'Zilb inside the cave.

1. Ride south to the area named The Den
of Flame, which you can enter by the main gate on the southeastern side
of it at (40,67). From now on kill every dragonkin you see. At the cave entrance you should
find Mok'Morokk's Grog (39,66),
which looks like a big pot.
Go inside the cave and explore it entirely until you find Mok'Morokk's
Strongbox on the floor, which is a rectangular black/steel box.
Loot it and then get out of the cave.
2. Go east to Stonemaul Ruins (43,66).
Kill as many searing whelps/hatchlings as you can find, we'll need to
kill a lot to complete the other quest.
You should find Mok'Morokk's Snuff dead center of the fortress in plain sight
on a metallic floor texture, located at (44,65).

3. Go west while killing everything on your way, our next stop is the Bloodfen Burrow (33,66). Clear yourself a path to the cave, at the end of the cave you should find a Musty Scroll (31,66).

Click it, turn in the quest and get the follow up [51]Cortello's Riddle.
Now all that's left for you to do is to go back to the dragonkin dens and kill as many as needed to complete [43]Army of the Black Dragon and [43]Identifying the Brood. Note: You can find many whelps east of Stonemaul Ruins (47,67) and also south of it.
4. Ride back to
Fly to Gadgetzan, Tanaris.
In Gadgetzan:
Turn in [45]Tran'Rek, don't get the follow up.
Get quests:
1. [43]Wastewander Justice
2. [44]Water Pouch Bounty
Set your hearthstone to Gadgetzan.
General info about Tanaris, Feralas and Hinterlands:
While killing stuff in Tanaris if you find an item named [OOX-17/TN Distress Beacon]. Right click it and keep the quest. You'll find beacons in Feralas and Hinterlands as well, proceed equally with those. Each of those beacons start a quest where you will have to find a Homing Robot and escort it. The beacons won't always drop for you, they are kinda rare. The escort quests are hard to do solo especially for certain classes. But if you are lucky to find all 3 beacons you should really put the effort and finish all 3 rescue quests, it will be described when to do them in the guide later on. Anyway, if you don't get a distress beacon, or if you don't manage to complete the rescue quests, it's not a big deal, this is optional, it's a nifty exp bonus but it's not that important
Sell, Repair, re-supply food/drink (3 stacks).
No map needed for this very short part.
Get out of Gadgetzan, ride east until Noonshade Ruins (61,24),
kill all the Bandits you can find there (If it's crowded just skip this
part and keep riding east).. Then go further east to
In Steamwheedle port get:
1. [45]Pirate
Hats Ahoy!
2. [45]WANTED:
Andre Firebeard and [46]WANTED: Caliph Scorpidsting
from the wanted poster.
3. [44] Screecher
Spirits
4. [45] Southsea
Shakedown
Turn in [45]Stoley's Debt and get the follow up [46]Stoley's Shipment.
Ride back towards Gadgetzan, make a stop at Noonshade Ruins and kill bandits / thieves there until you finish Wastewander Justice and Water Pouch Bounty. If the place is crowded, there are more wastewander camps southeast of here (63,30).
Go back to Gadgetzan and turn in [44]Water Pouch Bounty and [43]Wastewander Justice, get the follow up [44]More Wastewander Justice.
Ride north to Thousand Needles and to the Shimmering Flats at the Mirage Raceway (80,75).
Turn in [38]News for
Fizzle at Fizzle Brassbolts.
Get quest [50]Gahz'Rilla (Dungeon) from Wizzle Brassbolts.
Turn in [37]Goblin
Sponsorship at Pozzik don't get the follow
up but on the other hand get the quest [41]Keeping
Pace from Pozzik. Then go talk to Zamek who is just south of Pozzik,
he should have a blue question mark over the head. Start his quest, follow him,
he will set up an explosive and distract Rizzle Brassbolt out of his house. While Rizzle
is away go quickly loot the Unguarded Plans.
Complete the quest, get the follow up [41]Rizzle's Schematics
and turn it in at Pozzik.
You can destroy the Sample of Indurium
Hearthstone back to Gadgetzan and fly to
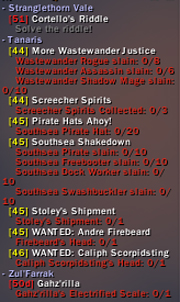
Your quest log should now look like this:
In
Get [42]War on the Woodpaw from Hadoken Swiftstrider, [46]The Mark
of Quality from Jangdor Swifstrider inside the big tent building in front of the
wyvern master. [45]A Strange Request
from Witch Doctor Uzer'l right outside that tent
building.
Go to the
Get [43]The Ogres of Feralas from Rok Orhan, a roaming orc npc with red armor.
Ride southwest, to the lower wilds, you should soon encounter some gnolls. There are many camps around (71,54). Kill them until you have 10 Woodpaw Gnoll Manes, and for those who didn't go to Uldaman, it's time to grind your way up to level 46 on those gnolls!